
Carbon Moto USA / Rider support
Road Glide death wobble steering stabilizer

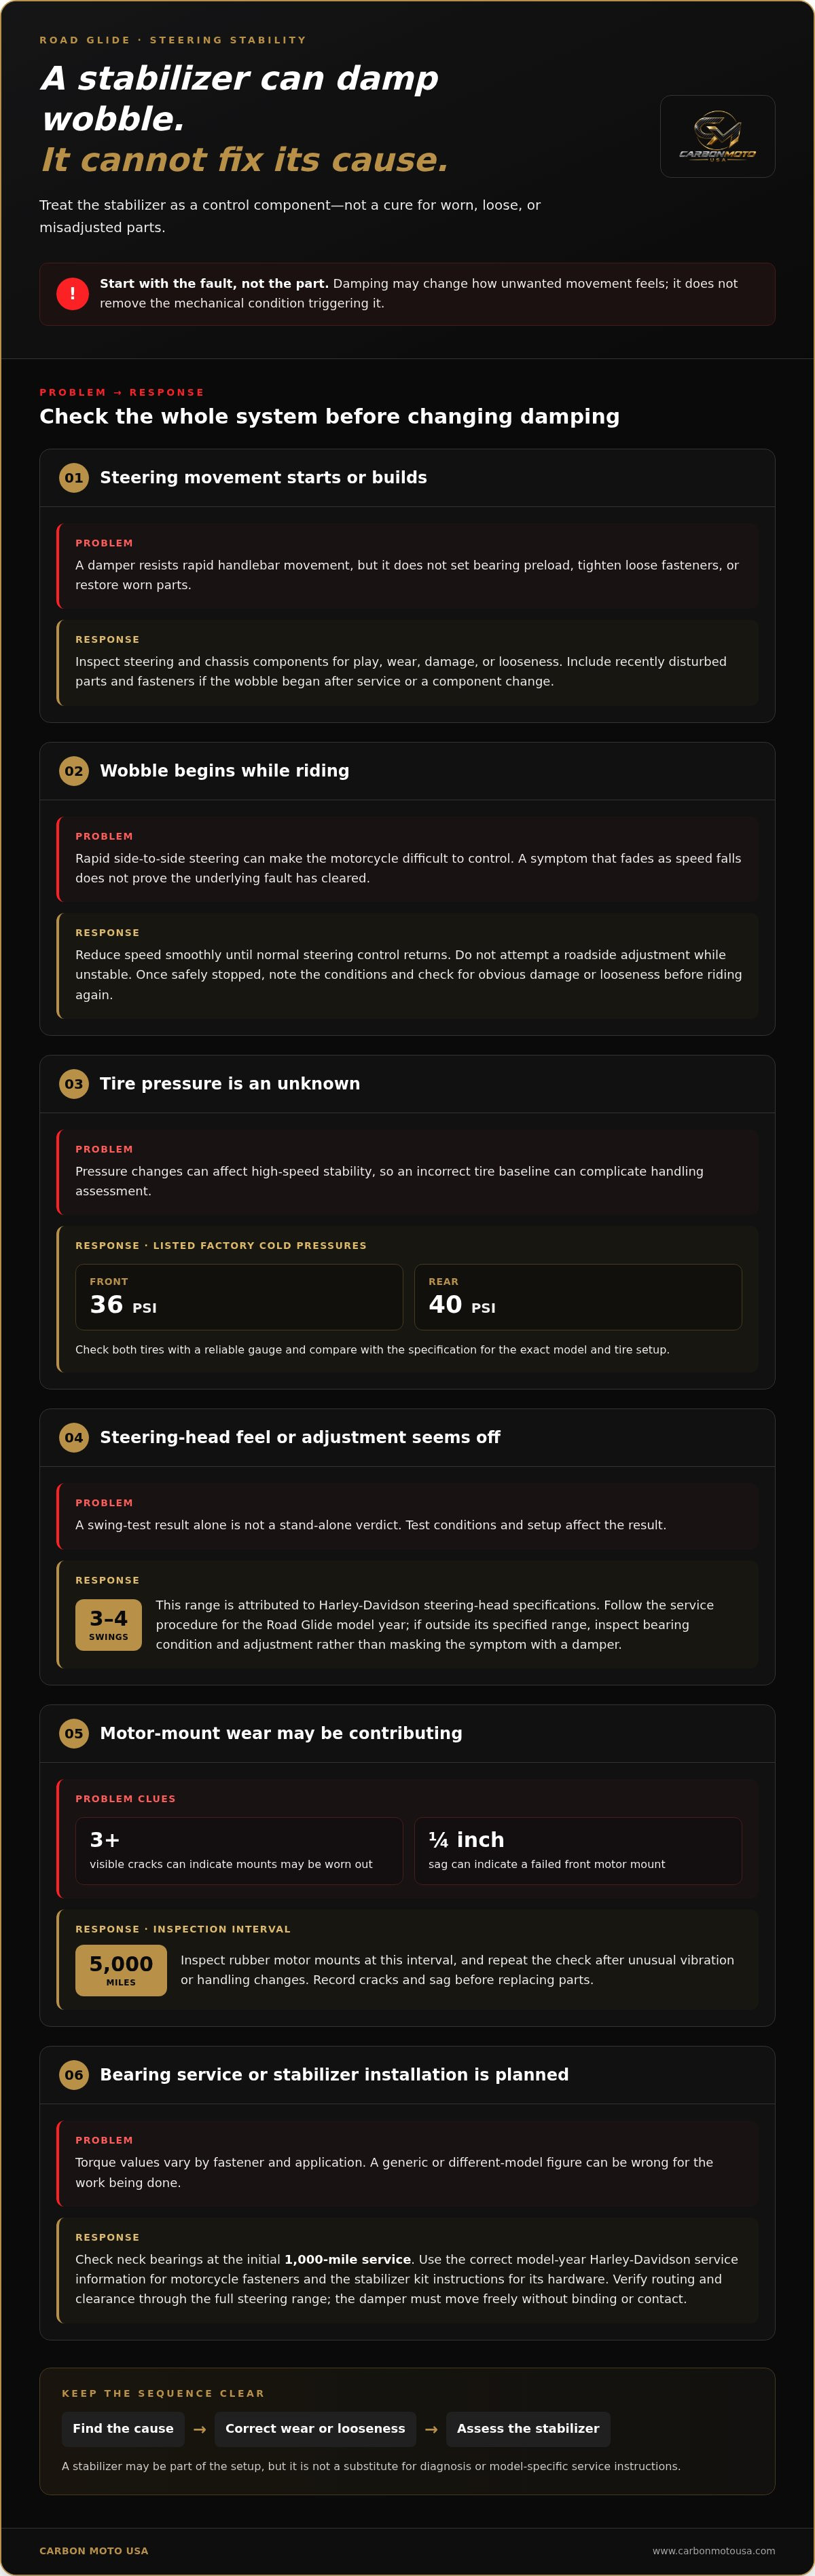
A Road Glide death wobble steering stabilizer can help damp unwanted steering movement, but it can’t fix worn, loose, or misadjusted parts that contribute to instability. Treat it as a control component, not a cure for the underlying cause.
When the front end starts oscillating, it’s natural to suspect the stabilizer first. A sound assessment looks beyond it: inspect steering and chassis components, identify play or wear, and address the cause before deciding whether a stabilizer is appropriate. This guide explains what a stabilizer can and can’t do, how it fits into diagnosis, and where to find the correct torque specifications. Use service information for your Road Glide model year and the stabilizer kit’s installation instructions for the relevant fasteners, rather than relying on a generic torque figure.
Key Takeaways
- Use a steering stabilizer to damp unwanted movement, not as a substitute for finding and correcting the source of instability.
- Assess steering, suspension, tires, and chassis components for wear or play before deciding whether the stabilizer needs attention.
- Compare tire pressures with the specifications for your Road Glide, since pressure changes can affect high-speed stability.
- Use the correct model-year service information and the stabilizer kit’s instructions for fastener torque specifications.
Steering dampers and their limits
- Understand what the damper controls before judging its effect. A steering damper resists rapid handlebar movement, helping reduce the force and speed of unwanted oscillation. It doesn’t set bearing preload, tighten loose fasteners, or restore worn parts. On a Road Glide, that distinction matters: damping can change how movement feels without removing the mechanical condition that triggers it. Assess the damper as part of the steering system, not as a substitute for diagnosis.
- Find the source of instability before changing the damping. Play can build across steering and chassis components, so inspect connections and moving parts systematically. Look for looseness, wear, damage, or movement where the assembly should remain secure. A worn damper can contribute to poor control, but replacing it alone won’t correct play elsewhere. If the wobble began after service or a component change, include recently disturbed fasteners and parts in the inspection.
- Use the steering-head check as one diagnostic clue, not a stand-alone verdict. A swing-test result of 3 to 4 swings is attributed to Harley-Davidson steering-head specifications. Follow the procedure in the service information for your Road Glide model year; test conditions and setup affect the result. If the movement falls outside the specified range, inspect the steering-head bearings and adjustment rather than using a damper to mask the symptom.
- Match every adjustment to the correct documentation. Torque values vary by fastener and application, so don’t use a figure from another Road Glide year or stabilizer installation. Use the model-year Harley-Davidson service manual for motorcycle fasteners and the stabilizer manufacturer’s instructions for kit hardware. After work, verify routing and clearance throughout the steering range. A damper that binds, contacts nearby parts, or is installed incorrectly can restrict steering movement rather than control it.
A steering damper will not correct the underlying cause of a high-speed weave; it can change how unwanted movement feels, but it does not remove the cause. The page claims that a steering damper dampens 30% of unwanted vibrations. Treat that figure as a description of damping, not a diagnosis. If a weave persists, identify and address its underlying cause rather than relying on the damper alone.
Steering stabilizers and death wobble
- Separate the oscillation from its cause. During death wobble, the steering can turn rapidly from side to side, making the motorcycle difficult to control. A stabilizer resists sudden movement, but it doesn’t eliminate accumulated play in other components. Record when the movement begins, such as after a bump or under a particular riding condition. That pattern can guide a systematic inspection instead of making the damper the only suspect.
- If wobble starts on the road, prioritize control over diagnosis. Reduce speed smoothly until normal steering control returns, as recommended for an active wobble. Don’t attempt a roadside adjustment while the motorcycle remains unstable. Once safely stopped, note the conditions and inspect for obvious damage or looseness before riding again. A symptom that disappears as speed falls still needs attention; that change doesn’t prove the underlying fault has cleared.
- Inspect the whole steering system, not just the damper. Check relevant components for wear, damage, or movement where the assembly should remain secure. Pay attention to bearings, fasteners, suspension connections, and stabilizer mounts. A loose connection can allow small movements to build into larger steering inputs. Replace parts that show play, then reassess the complete assembly. A new stabilizer alone won’t correct looseness elsewhere.
- Evaluate the stabilizer after identifying other faults. Death wobble can rapidly wear a stabilizer and shocks, so assess their condition along with any necessary repairs. Look for damage, binding, or inconsistent resistance through steering travel. Don’t assume a new damper has solved the problem just because the steering feels firmer. The repair sequence matters: correct worn or loose parts, then determine whether the stabilizer or shocks also need replacement.
- Use model-specific instructions before changing hardware. A Road Glide stabilizer must move freely through the steering range, without contact or interference. Use the correct service information and kit instructions for installation and torque values. A Road Glide death-wobble steering stabilizer can be part of a considered setup, but not a substitute for diagnosis. As you plan the component choice, review Road Glide steering components alongside the motorcycle’s service requirements.
Harley road
- Set tire pressures using the Road Glide’s specified cold-pressure values. The listed factory figures are 36 PSI front and 40 PSI rear. Check both tires with a reliable gauge before riding. Compare the readings with the specification for your exact model and tire setup. A pressure difference can change how the motorcycle responds, so correct pressure before assessing handling. Don’t use a stabilizer adjustment to compensate for an incorrect tire baseline.
- Inspect steering-head bearings and adjustment as part of scheduled service. Road Glide neck bearings should be checked at the initial 1,000-mile service. Follow the Harley-Davidson procedure for your model year, including its specified test and adjustment method. A bearing that’s too loose can allow movement; excessive preload can make steering feel stiff. Use the correct service-manual torque values for the relevant fasteners, rather than borrowing figures from another model.
- Examine the rubber motor mounts for visible deterioration. Three or more visible cracks can indicate mounts may be worn out. Check the mount position as well: a failed front motor mount can sag by 1/4 inch. Inspect mounts every 5,000 miles, and repeat the check after unusual vibration or handling changes. Record cracks and sag before replacing parts. Accurate observations help distinguish mount wear from tire or steering concerns.
- Trace every fastener disturbed during maintenance. Use the Road Glide service manual to find torque specifications for the model year and component. Use the stabilizer kit’s installation instructions for its supplied hardware. Keep these references separate: a chassis fastener and a kit fastener may have different requirements. Tighten with a suitable torque wrench and follow the specified procedure. Don’t guess based on bolt size or use a value from an unrelated Harley-Davidson assembly.
- Reassess handling after checking the basic setup. Confirm tire pressure, bearing adjustment, and motor-mount condition first. Then check that the steering moves freely and the hardware remains secure. If instability persists, document when it occurs and what maintenance preceded it. This sequence offers a clearer direction for further diagnosis than changing several settings at once. Keep service records, including mileage and measured pressure, to compare changes over time.
Bagger wobble
- Record the conditions when a Road Glide starts to wander. Note speed changes, road surface, wind, passenger load, and recent maintenance. Distinguish a steady weave from a sharp, repeated handlebar oscillation. Those descriptions point to different checks. For example, a symptom that changes after a bump warrants careful inspection of the tires and chassis before adjusting the steering damper.
- Measure tire pressure before the next ride, using the Road Glide’s specified cold-pressure values. A 2 PSI drop can change a Harley Road Glide’s high-speed ride from smooth to unstable. A 5 PSI drop can cause noticeable front-end wallow. Record the gauge readings and compare both tires with the motorcycle’s applicable specifications. Don’t use an assumed pressure or a stabilizer adjustment to cover a pressure problem.
- Inspect both tires for uneven wear, visible damage, and changes since the last check. Compare the tread across the front tire, then inspect the rear. Note whether handling changed after a tire replacement or pressure adjustment. If a Road Glide feels unsettled after maintenance, it needs a broader review, not just a damper change. Keep these observations with pressure readings and service notes.
- Assess the motorcycle as a complete chassis system. Check for looseness, worn connections, or damage that could allow movement under load. Include steering, suspension, and wheel-related components in the inspection. A stabilizer can resist rapid steering movement, but it can’t correct faults elsewhere. If wobble recurs, don’t mistake symptom suppression for proof that the motorcycle is mechanically sound.
- Use findings to choose the next step. Correct pressure first, then address any observed wear or looseness using model-specific service information. Reassess only after repairs and setup checks. If a stabilizer remains part of your Road Glide setup, review Road Glide stabilizer options alongside the installation instructions and torque specifications for the relevant hardware.
Carbon Moto USA: BMW R 1300 GS Carbon Fiber
Carbon Moto USA offers BMW R 1300 GS Carbon Fiber for riders planning a focused build around that motorcycle. It serves a different purpose from diagnosing Road Glide instability, so treat it as a separate consideration, not a wobble remedy. First resolve steering concerns through the appropriate inspection and model-specific service information.
Turn to this offering when your project involves the BMW R 1300 GS and you’re considering carbon-fiber parts as part of its design. Carbon Moto USA also offers BMW R 1250 GS Carbon Fiber, Harley Davidson Pan America Carbon Fiber, and Ducati Carbon Fiber. Keep the motorcycle and the goal of each component clear when planning upgrades. To explore the BMW R 1300 GS Carbon Fiber offering, visit www.carbonmotousa.com.
Choose the next upgrade with care
Once you’ve addressed the mechanical condition, decide whether a stabilizer belongs in your Road Glide setup. Start with the motorcycle’s intended use, compatible hardware, and a clear understanding of the component’s purpose. A Road Glide death wobble steering stabilizer should be part of a carefully planned build, not a shortcut around sound diagnosis. Keep installation instructions and model-specific service information central to your decision.
For riders considering this component, Carbon Moto USA offers the Harley Davidson Road Glide Death Deleter Steering Stabilizer Kit. Review the product in relation to your motorcycle and your build priorities, then use the applicable instructions for installation details and torque specifications. If you’re ready to discuss the offering, contact Carbon Moto USA for help.
Make each upgrade deliberate, with your Road Glide’s mechanical integrity at the center of the plan.