Carbon Moto USA / Rider support
How to Improve Harley Bagger Handling With Road Practice

Better Harley bagger handling starts before the first tight turn. To learn how to improve Harley bagger handling, set the bars so your arms stay relaxed and responsive, then build skill in stages: straight-road practice, open-space cone drills, and controlled slow-speed turns. Consistent inputs and a balanced body position help you manage the motorcycle with greater precision.
A heavy bagger can feel demanding at low speed, especially when a turn tightens or a parking maneuver leaves little room. The challenge is real, but control develops through deliberate practice, not forceful steering.
This guide explains how handlebar position and rider posture affect leverage, then lays out a practical progression from straight roads to parking-lot exercises and slow-speed cornering. You’ll learn what to focus on in each drill, how to refine your position, and when safety training can help develop steadier balance and control. Start with the fundamentals, keep each session focused, and add complexity as your inputs become smoother.
Key Takeaways
- Set handlebar reach and height so your arms stay relaxed while you retain useful steering leverage.
- Build confidence on open, straight roads before moving on to tighter curves and more demanding routes.
- Use an open parking area and cones to practise controlled turns and refine your steering inputs.
- Sit close enough to the bars to bend your elbows and guide the motorcycle without straining.
- Develop slow-speed balance with deliberate practice, smooth control inputs, and motorcycle safety training.
1. Handlebar position and leverage
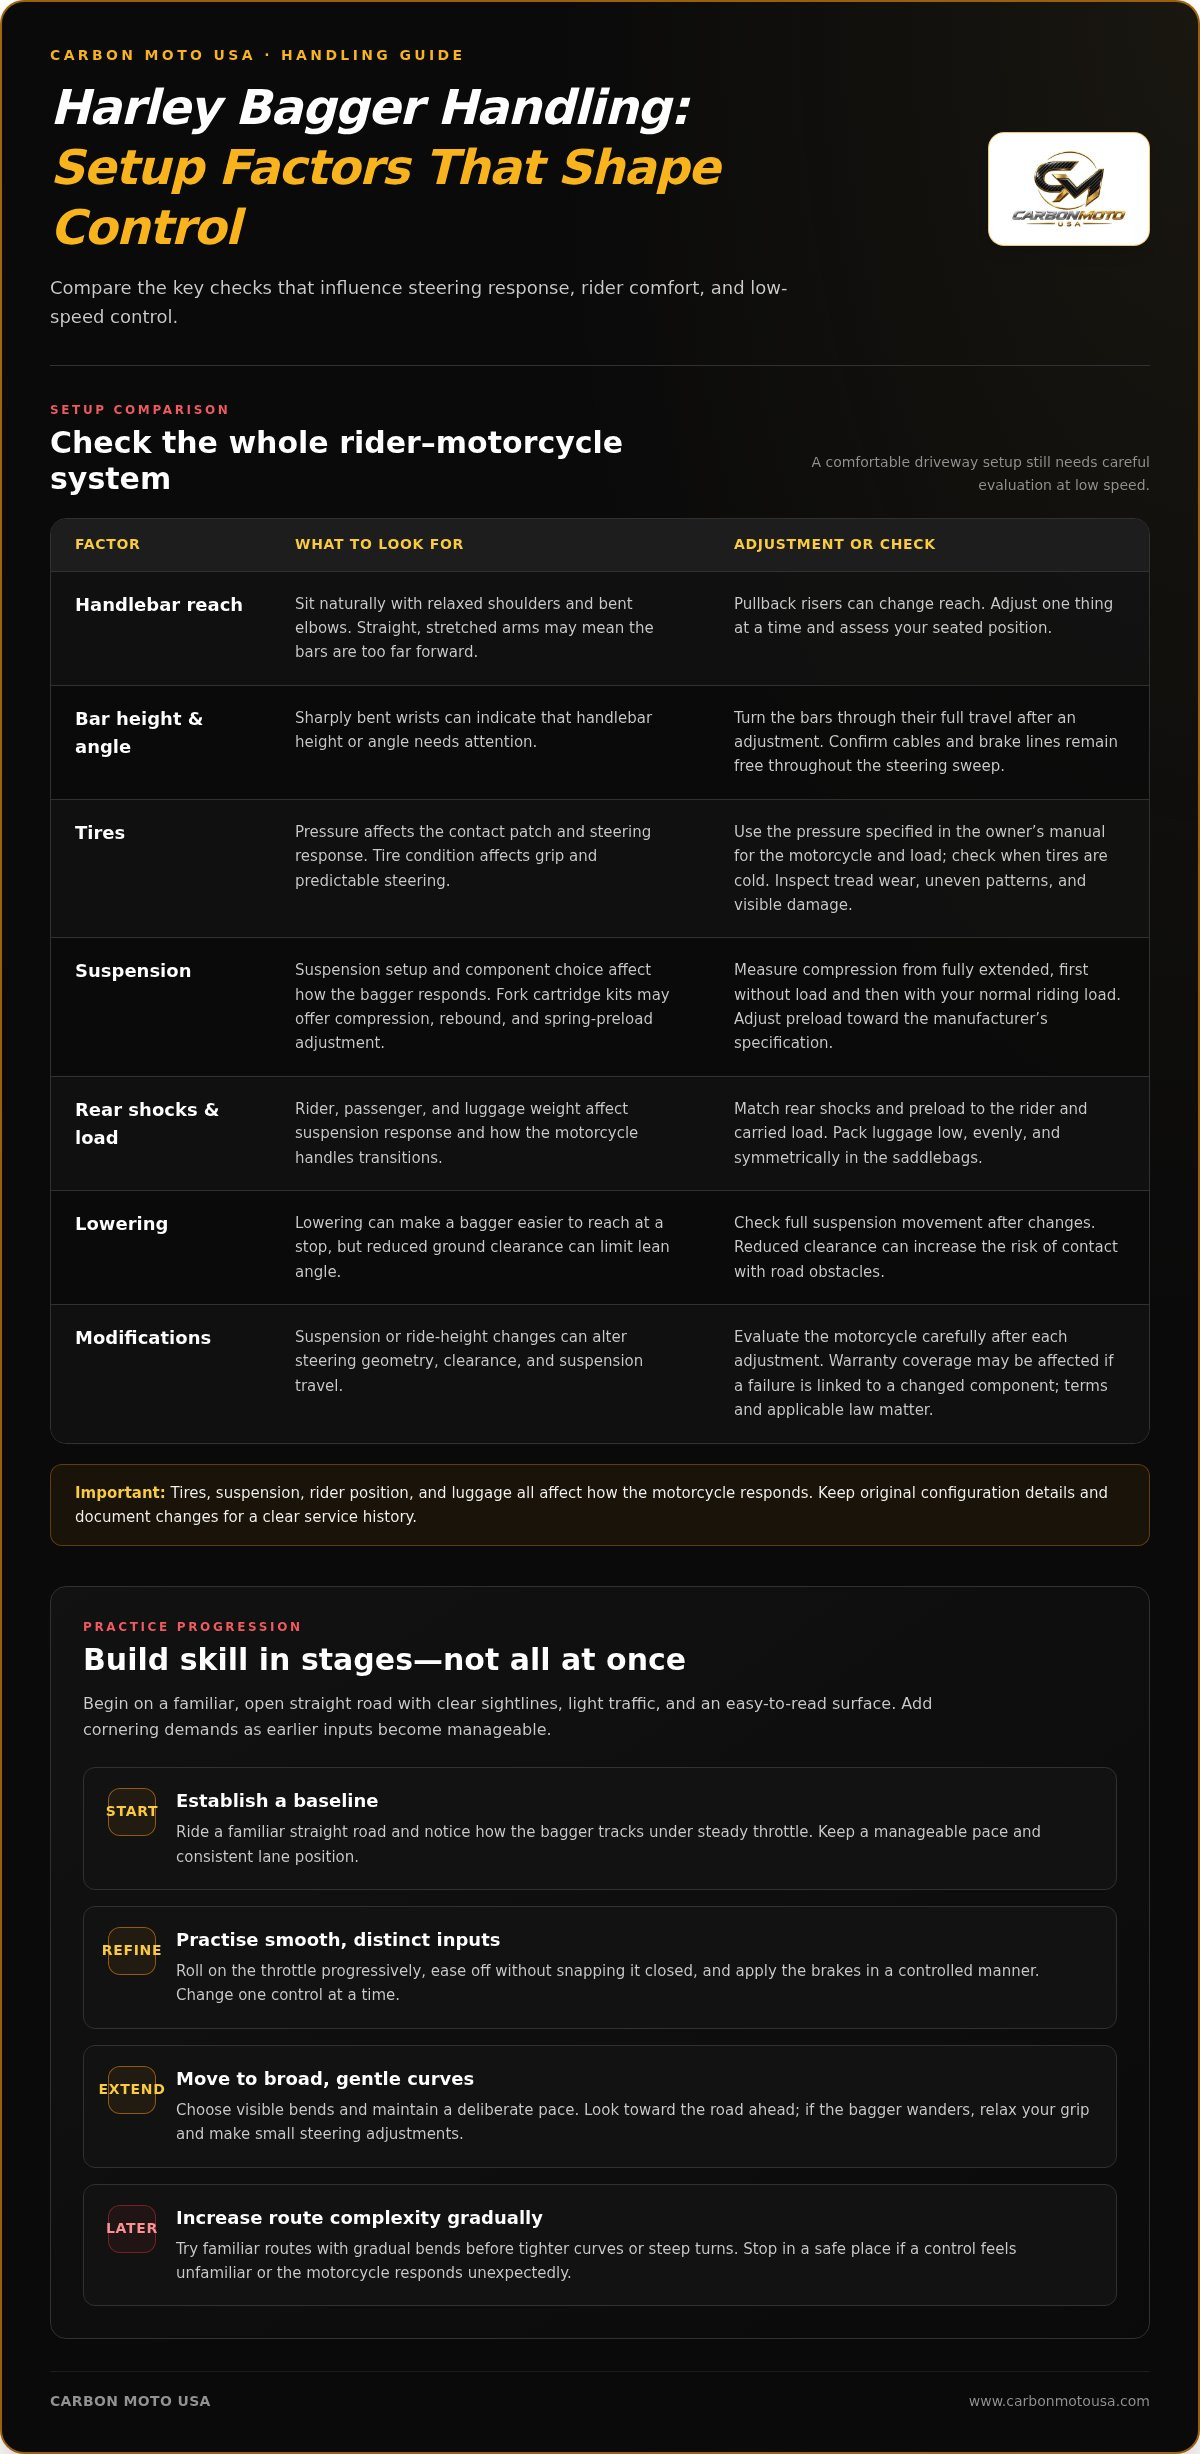
Start with the rider triangle: the relationship between your seat, handlebars, and foot controls. On an 800-plus-pound Harley bagger, suitable bar reach can reduce physical effort and make steering inputs easier to manage. Sit naturally, keep your shoulders relaxed, and hold the grips with bent elbows. If your arms are stretched straight, the bars may sit too far forward. If your wrists feel sharply bent, their height or angle may need adjustment.
Pullback risers can change handlebar reach to suit the rider. Make one adjustment at a time, then assess your reach while seated and turning the bars through their full travel. A slight rise with substantial leverage can support control, but the right position depends on your body and riding posture. After any change, check that cables and brake lines remain free throughout the steering sweep. A position that feels comfortable when stationary should not restrict movement.
When considering how to improve Harley bagger handling, treat bar setup as one part of the system. Tires, suspension, rider position, and luggage all affect how the motorcycle responds. A change that feels better in the driveway still needs careful evaluation at low speed before normal riding.
Suspension options vary in cost and performance based on component complexity, adjustability, and intended use. Fork cartridge kits may offer compression, rebound, and spring-preload adjustment; setup determines how those features feel on the road.
Modifications can affect warranty coverage if a failure is linked to the changed component. Warranty terms and applicable law matter. Keep the original configuration details and document changes to maintain a clear service history.
Set tire pressure to the value specified in your Harley-Davidson owner’s manual for your motorcycle and load. Check it when the tires are cold, since pressure affects the contact patch and steering response.
Measure suspension compression from fully extended, first without load and then with your normal riding load, to assess sag and preload. Adjust preload toward the manufacturer’s specification, accounting for any luggage or passenger you regularly carry.
Adjustable fork cartridges can refine front-end damping and spring preload. At the rear, correctly matched shocks and preload settings help the suspension respond to the rider and carried load.
Tire condition affects grip and predictable steering. Inspect tread wear, uneven patterns, and visible damage, and use the tire specification suited to your bagger.
Lowering can make a bagger easier to reach at a stop, but reduced ground clearance can limit lean angle and increase the risk of contact with road obstacles. Check the full suspension movement after changes.
Luggage adds weight and can shift its distribution, changing how the bagger responds during braking, cornering, and transitions. Pack evenly and secure loads low and symmetrically in the saddlebags.
Suspension or ride-height changes can alter steering geometry, clearance, and suspension travel. Poorly matched components or settings may reduce control, so evaluate the motorcycle’s response carefully after each adjustment.
2. Practicing on straight roads before attempting curvy routes
Start on an open, straight road before choosing a route with tight bends or steep turns. A predictable stretch lets you focus on throttle control, braking, lane position, and the bagger’s response without adding cornering demands. Choose a familiar road with clear sightlines, light traffic, and a surface you can read easily. Avoid frequent intersections, gravel, and abrupt elevation changes while establishing a steady baseline.
Use each straight section to practise smooth, distinct inputs. Roll on the throttle progressively, then ease off without snapping it closed. Apply the brakes in a controlled manner and notice how the motorcycle settles. Look toward the road ahead rather than fixing your eyes on the front wheel. These observations help distinguish responses caused by your inputs, the pavement, or the motorcycle’s setup.
Keep your first rides simple. Ride at a manageable pace, maintain a consistent lane position, and leave room to respond to traffic. On a quiet straight, practise gentle speed changes and steady tracking. If the bagger wanders, relax your grip and make small steering adjustments instead of correcting abruptly. Stop in a safe place if a control feels unfamiliar or the motorcycle responds unexpectedly.
Build complexity in stages instead of going straight from a level road to a demanding mountain route. Once your straight-line inputs feel controlled, move to broad, gentle curves. Then try a familiar route with gradual bends and good visibility. Save steep turns and tighter curves for later, when you can focus on line choice and cornering without also learning basic throttle or braking control.
Use this progression on each outing:
- Establish a baseline: Ride a familiar straight road and notice how the bagger tracks under steady throttle.
- Refine inputs: Practise smooth acceleration and braking, changing one control at a time.
- Add gentle curves: Choose a route with visible, broad bends and maintain a deliberate pace.
- Increase complexity: Progress to tighter turns only after the earlier route feels manageable.
After each ride, recall a specific moment, such as a braking approach or a mild curve, and identify the input that felt least precise. Keep the next practice ride focused on that skill. Riders considering equipment alongside practice can explore motorcycle component options as a separate part of their setup decisions.
Treat straight-road practice as the starting point, not as a test of how quickly you can move on to more demanding riding. Choose an open, straight stretch and give yourself time to become comfortable there before selecting roads with curves or steep turns. Keeping to this simpler route lets you focus on the basic experience of riding a bagger without adding a more challenging route at the same time. When straight-road practice feels manageable, you can consider moving on to curvier roads with steep turns. There is no need to rush that transition: continuing to use open, straight roads is a reasonable way to build up to bagger riding. The aim is to progress from straight routes to more demanding ones, rather than begin with the most challenging route.
3. Practicing turns and cone drills in a parking lot
An open parking lot gives you room to practise slow-speed turns away from traffic and tight road boundaries. Choose an empty, level area with a clean surface, then set out cones for a simple path. Leave generous space between them at first. Focus on smooth control, not a narrow course or quick completion.
Begin with a straight approach and a wide weave. Look toward the next opening rather than staring at the cone beside your front wheel. Keep your arms relaxed, steer progressively, and use steady throttle. Make each pass wide enough to stay balanced. If you clip a cone or need an abrupt correction, widen the path and repeat at a controlled pace.
Once the weave feels consistent, use the cones to practise broad turns in both directions. Ride a large circle around one cone, then reverse direction and repeat. Notice if one side feels less natural. Turn your head and eyes toward your intended path, and let the motorcycle lean as your arms guide it smoothly. Avoid forcing the handlebars or adding sudden throttle.
Next, practise a figure-eight around two cones with ample space between them. Enter at a walking pace, turn your head toward the exit, and let the bagger arc around each marker. Focus on a calm transition between directions. If the motorcycle feels unstable, pause, reset your line, and make the next loop wider. Clean, broad figure-eights build more useful control than squeezing into a tight pattern too soon.
Keep each exercise focused. Change only one variable at a time, such as your entry line or throttle steadiness. A simple sequence works well:
- Set the course: Place cones on level pavement, leaving enough room for broad turns.
- Warm up: Ride straight through the course at a controlled pace.
- Weave: Look through each opening and steer with smooth inputs.
- Turn: Circle a cone in both directions, then practise a broad figure-eight.
- Review: Identify where your line tightened or your control became abrupt.
Move the cones if the surface has loose gravel, oil, or other hazards. Keep the lot clear of vehicles and pedestrians, and leave room to exit without crossing your practice path. Finish with a drill you can complete smoothly, such as a wide turn around one cone. This gives you a clear reference for your next session.
4. Sitting closer to the handlebars for control
A shorter rider may need to sit closer to the handlebars to bend their elbows and turn the bars more easily. Start in a natural position, then move forward until your hands rest on the grips with your elbows bent. Keep your shoulders relaxed, not pulled forward. This gives your arms room to guide the bagger through a turn without leaning your chest heavily over the bars.
Check your reach while the motorcycle is stationary and upright. Turn the handlebars fully left, then fully right, and notice whether your elbows stay bent. If one arm straightens or your torso twists, adjust your seated position and repeat the sweep. Keep your wrists aligned neutrally with your forearms. A strained wrist or raised shoulder can make smooth steering corrections harder.
Riders under 5 feet 2 inches tall may have difficulty lifting a bagger off its kickstand. That makes a stable starting position especially important. Before moving, settle onto the seat, place your hands on the grips, and establish a balanced posture. Avoid reaching for the bars while your hips remain far back. A deliberate seated setup helps you begin each maneuver with your arms ready to steer.
Use a stationary check before a parking-lot exercise. Sit forward enough to bend both elbows, then turn the bars through their full range. Confirm your hands remain secure on the grips and your shoulders stay level. Next, practise a broad turn at low speed. Notice whether you can look through the turn while keeping your arms relaxed. If you have to pull your body toward one grip, adjust your position before repeating the turn.
Your seat should help keep your body in place. Gripper material can reduce sliding forward or backward on the saddle. A consistent position can support control during acceleration, deceleration, and cornering. For example, if braking pushes you forward, reset your posture before the next turn instead of bracing with tense arms. Stable contact with the saddle lets your hands focus on steering.
Make adjustments methodically. Move your seated position forward slightly, check your elbow bend, and repeat the same slow maneuver. If your knees become cramped or your hips press against the tank, you may have moved too far. Return to a balanced position that lets you reach both grips and keep your upper body relaxed. Compare the same left and right turns after each change to identify which position gives you more consistent control.
5. Slow-speed maneuvering and cornering
At walking pace, a Harley bagger needs smooth, coordinated inputs. Practise steady throttle and gentle clutch control in an open area, with your eyes on the path ahead. For a tight turn, look toward the intended exit instead of the front fender. Follow a deliberate arc and avoid abrupt steering corrections that disrupt balance. Repeat turns in both directions to identify which needs more practice.
Foot position can also affect control. An athletic stance places your feet on the balls of your feet rather than resting your heels heavily on the floorboards. This can make it easier to move with the motorcycle and manage obstacles. Moving foot pegs or floorboards up and back can improve rider position, help maneuver around obstacles, and add ground clearance for greater lean angles.
Use a consistent sequence on a familiar bend. Set your entry speed before the turn, look through the curve, and steer smoothly toward your chosen line. Keep your upper body relaxed and avoid grabbing the bars while leaning. As the road opens, ease back onto the throttle. On an unfamiliar curve, slow down and choose a line that leaves room to respond to changing conditions.
For steadier braking and cornering, apply brake pressure progressively and complete most braking before entering a turn. Keep the motorcycle settled with smooth inputs, then hold a controlled line through the curve. Practise on a clear, familiar road before adding tighter bends or more complex conditions.
Slow-speed balance improves with structured instruction as well as repetition. A motorcycle safety course can help you practise balance and handling with guidance. Apply course techniques to simple exercises, such as a controlled U-turn in an open space, then work toward tighter turns as your steering becomes more consistent. Keep the practice area clear and choose a surface you can assess easily.
After a practice run, identify one specific point to refine, such as your gaze through a tight turn or your foot position over a floorboard. Repeat the same maneuver and focus on that adjustment. If steering stability is a concern on a Road Glide or Street Glide, explore the Death Deleter steering stabilizer kits as an equipment option. Their fitment is model-specific, so match the kit to your motorcycle.
Some riders describe the Road Glide's low-speed feel in terms of its front-end layout. A Harley-Davidson forum participant attributed its handling to the frame-mounted fairing, saying it puts less weight on the forks and improves slow-speed handling and rebound. Treat this as one rider's explanation, and keep your focus on smooth, controlled inputs through a tight turn.
For a bagger, an athletic foot-control position places the rider on the balls of their feet. Raising and moving the foot pegs or floorboards back can add ground clearance, allowing greater lean angles. Consider both aspects when assessing fit: foot placement affects how you reach the controls, while clearance affects available lean angle. Keep adjustments consistent with a balanced riding position, and evaluate them during familiar practice before tackling more demanding turns.
Carbon Moto USA: BMW R 1300 GS Carbon Fiber
Carbon Moto USA offers BMW R 1300 GS Carbon Fiber for riders developing a BMW adventure bike build. The handling techniques in this guide focus on practice and control; carbon fiber components are a separate customization choice, not a substitute for rider skill or sound setup.
For other motorcycle projects, the available offerings include BMW R 1250 GS Carbon Fiber, Harley Davidson Pan America Carbon Fiber, and Ducati Carbon Fiber. Choose components that match the motorcycle you’re building, and keep handling adjustments grounded in the needs of that specific model.
If you’re planning a BMW R 1300 GS build or considering another listed option, contact Carbon Moto USA to discuss the relevant offering.
Make Your Next Ride a Deliberate Practice
Your next step in learning how to improve Harley bagger handling is to make each ride focused practice. Choose one skill to refine, such as holding a smooth line through a turn, and notice how your inputs affect the motorcycle. Build on what you observe in your next session. Consistent, purposeful practice can make control feel more familiar over time.
For riders planning a separate motorcycle build, Carbon Moto USA offers BMW R 1300 GS Carbon Fiber, BMW R 1250 GS Carbon Fiber, and Harley Davidson Pan America Carbon Fiber. These options serve different models and projects; they aren’t substitutes for road practice or a handling setup tailored to your bagger.
Keep your next move clear: practise with intention, and choose components that suit the motorcycle you’re building. Contact Carbon Moto USA for help exploring its offerings. Stay patient with the process, keep refining your technique, and enjoy the confidence that comes from riding with greater control.