
Carbon Moto USA / Rider support
Best steering stabilizer for Harley Road Glide

Road Glide wobble calls for careful diagnosis before choosing a stabilizer matched to the motorcycle. The best steering stabilizer for Harley Road Glide riders is one designed for the exact model and year, with adjustment suited to their riding needs. A stabilizer should not be treated as a fix for tire or steering-head problems.
It’s reasonable to want steadier handling without adding a complicated installation or a part that doesn’t fit. This guide explains how Touring-model fitment works, what the 16-click adjustment changes, and what riders report about wobble and installation. It also covers the factors that shape kit cost, so you can weigh the hardware and fitment details alongside the riding feedback. Use the sequence to distinguish a potential stabilizer upgrade from a front-end issue that needs attention first, and to understand what to expect before choosing a kit.
Key Takeaways
- Use the 16-click adjustment to tune steering resistance to your preference, then assess handling in a controlled, familiar setting.
- Fitment is model-specific: the kit is described for 2015-2026 Street Glide and CVO models, and it does not fit models equipped with an UltraCool Oil Cooler.
- Installation feedback describes a bolt-on process without cutting, drilling, or modification, though cow bells must be removed.
- Before adding a stabilizer to address wobble, inspect tire pressure and condition and consider steering-head bearings as part of diagnosis.
- Compare the kit’s fitment, adjustment range, installation requirements, and price when deciding whether it suits your Touring motorcycle.
16-Click adjustability
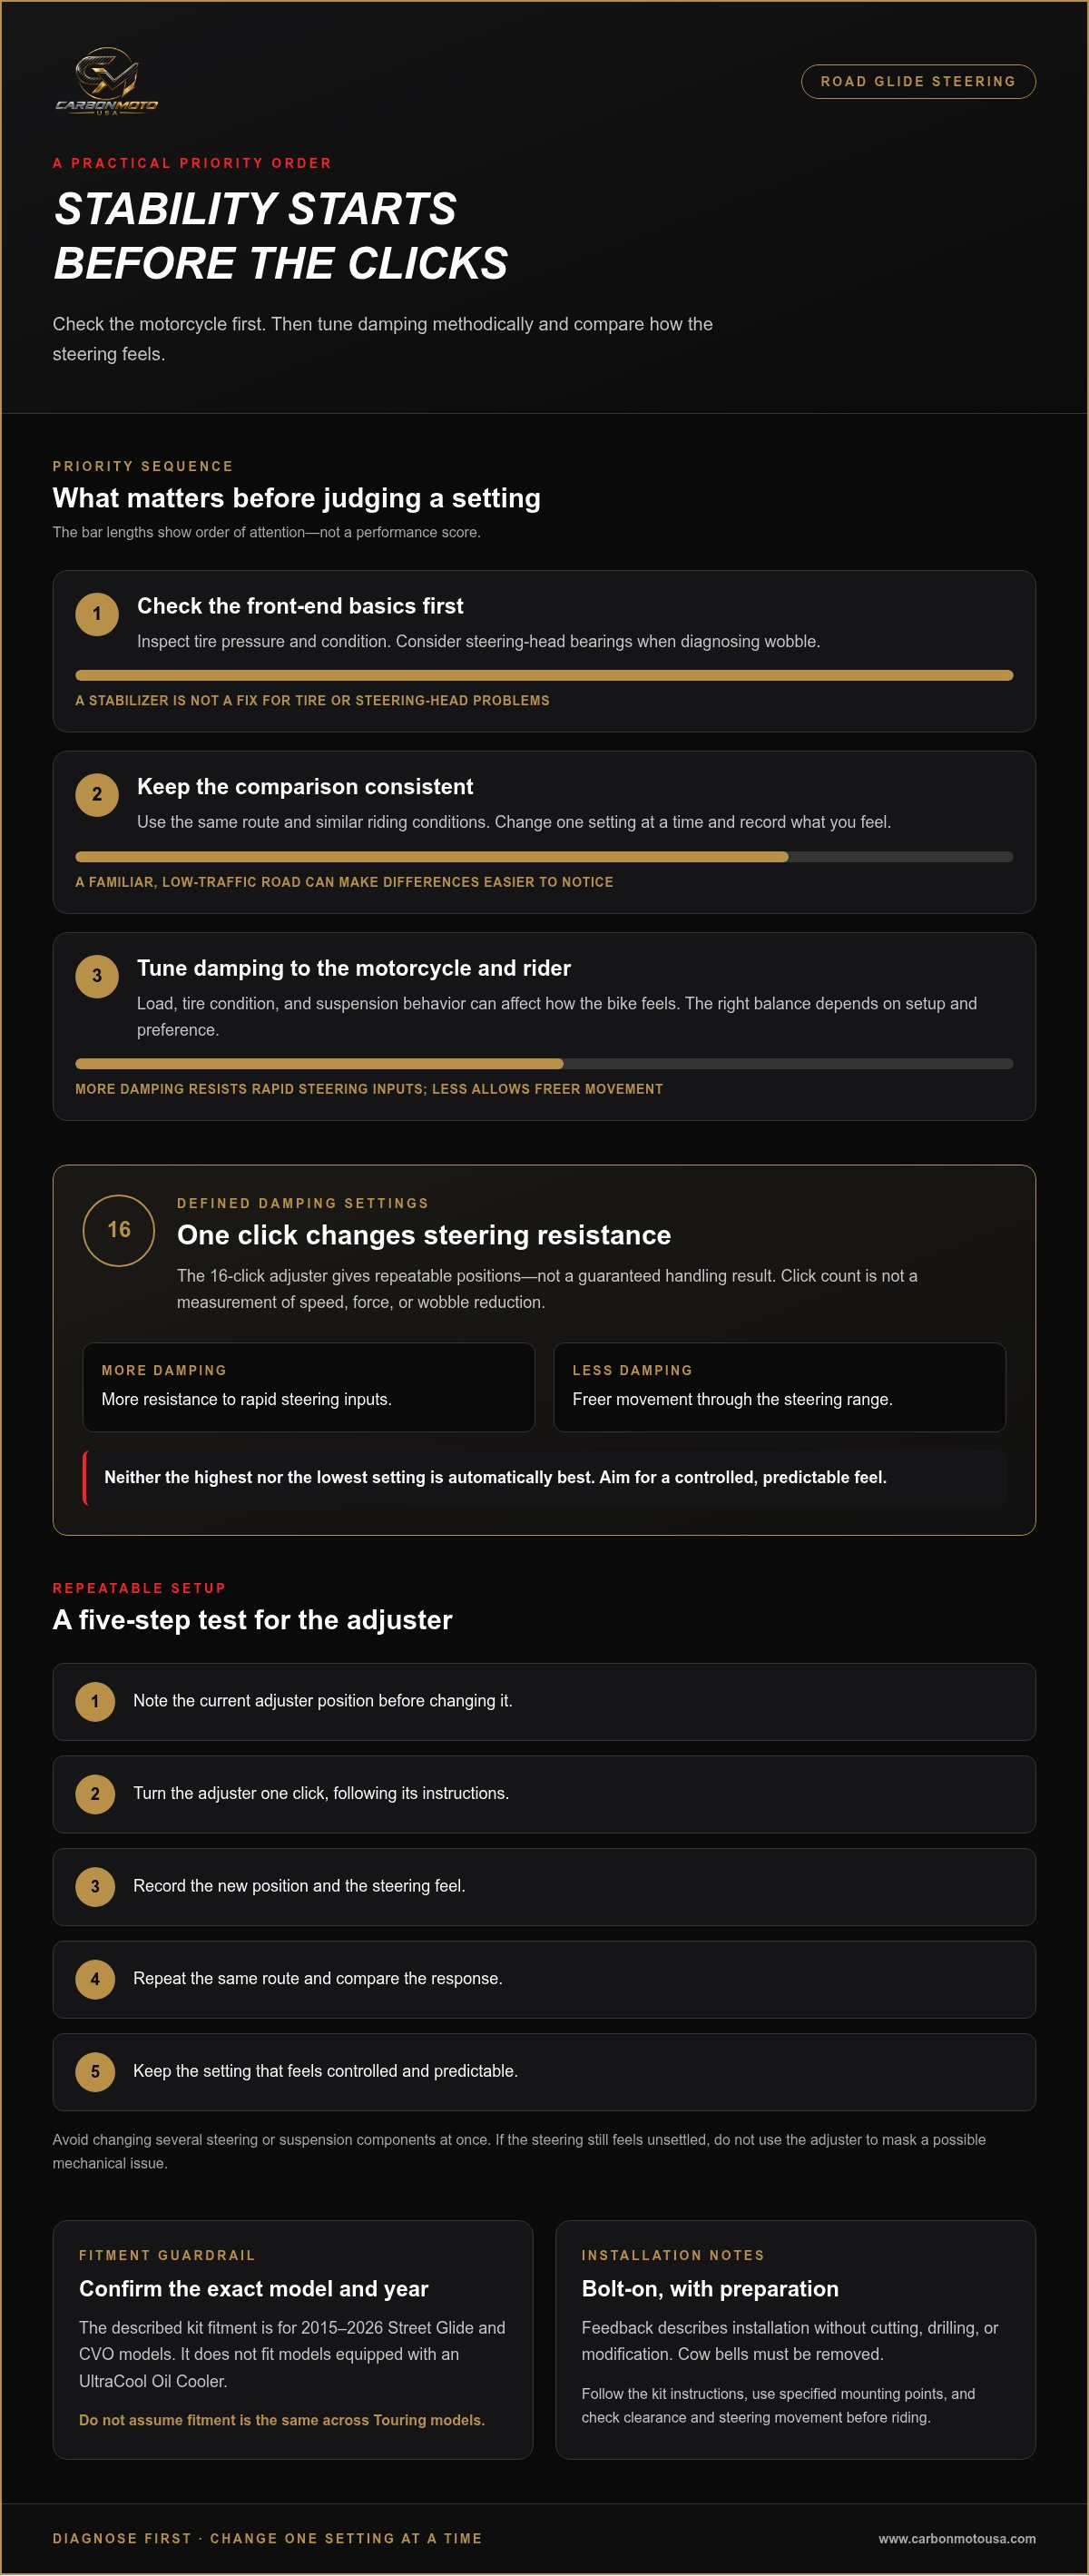
A 16-click adjuster gives riders defined damping settings. Each click changes resistance to steering movement. That lets you tune response instead of accepting one fixed feel. The number describes adjustment positions, not a guaranteed handling result. A click also isn’t a measurement of speed, force, or wobble reduction. Treat it as a repeatable setting you can compare during setup.
More damping can resist rapid steering inputs, while less damping allows freer movement through the steering range. The right balance depends on the motorcycle’s setup and the rider’s preference. Load, tire condition, and suspension behavior can all affect how a Road Glide feels. Adjusting a click changes the stabilizer’s damping response, not tire pressure or steering-head bearing condition, and cannot correct a mechanical fault.
Evaluate adjustments in a controlled way: make one change at a time and record the result. Compare settings on the same route and under similar riding conditions. A familiar, low-traffic road can make differences easier to notice. Avoid changing several suspension or steering components at once, or it will be difficult to tell which change affected the feel.
- Note the current adjuster position before changing it.
- Turn the adjuster one click, following its instructions.
- Record the new position and the steering feel.
- Repeat the same route and compare the response.
- Keep the setting that feels controlled and predictable.
For example, if a Road Glide feels nervous over small inputs, try changing the damping setting by a single click, then compare the same stretch of road. If the steering feels too resistant, return to the recorded baseline. This gives you a practical reference for judging the adjuster’s effect without guesswork.
Don’t assume the highest setting is automatically best. Maximum damping can feel different from the balanced response you want. Likewise, the lowest setting may not suit your motorcycle’s setup. Work through the 16-click range methodically, rather than jumping between extremes. Change one setting at a time, and keep notes. That makes each test useful and helps you reproduce a preferred setting later.
Click count alone cannot diagnose front-end instability. Check basic conditions, including tire pressure and wear, before interpreting a setting change. If the Road Glide still feels unsettled, do not use the adjuster to mask a possible mechanical issue. A stabilizer is a tuning component, not a substitute for sound tires and steering hardware. The goal is a controlled, repeatable setting that complements a properly functioning motorcycle.
Customer installation feedback
Installation feedback describes a bolt-on process with one important preparation step: remove the cow bells. The stabilizer is described as installing without cutting, drilling, or modifying the motorcycle, which can make the job more straightforward than a fabricated mounting solution. Still, bolt-on does not mean every step is identical across Touring models. Follow the kit instructions and use the specified mounting points.
A forum participant considering a damper for a 2012 Road Glide Custom expected the job might require additional parts. That concern shows why installation details matter before starting. Review the kit’s components and instructions first. Identify the cow bells and mounting area, then plan their removal before fitting the stabilizer. Don’t assume the same arrangement applies to every year or trim.
Use this sequence to keep the work organized:
- Confirm the motorcycle’s model and year against the kit instructions.
- Lay out the supplied components before removing existing parts.
- Remove the cow bells as required for stabilizer installation.
- Position and fasten the stabilizer according to its instructions.
- Inspect the assembly for clearance and secure mounting.
- Check steering movement before returning the motorcycle to service.
A clear work area helps prevent misplaced fasteners, and checking the parts before starting makes missing or mismatched components easier to spot. During fitting, align the stabilizer as instructed. Once fastened, inspect the assembly through the steering range for contact with nearby components or restricted movement. If anything binds, stop and reassess the installation rather than forcing movement.
Installation alone doesn’t determine warranty or insurance coverage; applicable warranty terms and policy language govern each claim. Keep the product instructions and installation records with the motorcycle’s service documents. Those records help establish what was installed and how the work was performed. For a Road Glide owner planning the job, the steering stabilizer kit details provide a useful starting point for understanding the intended installation.
Customer feedback supports a practical expectation: the job avoids cutting, drilling, and modification, but cow bell removal is part of the process. The 2012 Road Glide Custom owner’s concern about extra parts also reinforces the value of reviewing components before disassembly. Work methodically, follow the model-specific instructions, and inspect steering movement before riding. Those steps turn installation feedback into a clear preparation plan, not a promise that every motorcycle presents identical access or fitment conditions.
The kit’s components have pre-drilled mounting points, giving the installer defined locations instead of requiring new holes. This supports the bolt-on approach described above, but does not replace checking the instructions or confirming the parts match the motorcycle. Keep the supplied components together while preparing the work, and use the specified mounting points as directed.
A forum participant recommended checking the front tire’s pressure and condition when investigating instability. Consider the tire as part of troubleshooting rather than assuming every handling concern comes from the stabilizer or its installation. Check the tire alongside the assembly, and address any concern before treating the stabilizer as the only factor.
Harley Touring model fitment
Start with the exact model name and year. The fitment description covers 2015-2026 Street Glide and CVO models. It names those models specifically. Don’t treat that range as proof of Road Glide fitment. Similar Touring motorcycles can require different mounting arrangements. Model family, trim, and installed equipment all matter. Match the kit’s stated application to the motorcycle’s own designation. A shared platform name alone doesn’t establish compatibility.
Road Glide fitment deserves separate attention. A Harley-Davidson service-shop employee told a forum participant that adding a steering damper to a Road Glide was possible, but required fabrication. That account describes a possible installation, not a universal bolt-on fit, and does not establish that every damper uses the same mounting method. Distinguish model-specific fitment from general installation possibilities. A Street Glide application should not be assumed to suit a Road Glide.
Use these details to assess the motorcycle:
- Model: Identify Road Glide, Street Glide, or CVO.
- Year: Compare it with the stated 2015-2026 range.
- Equipment: Check for an UltraCool Oil Cooler.
- Mounting: Compare the instructions with the motorcycle’s hardware.
- Clearance: Consider nearby components around the stabilizer location.
The UltraCool Oil Cooler is a specific fitment exclusion: the kit does not fit Harley-Davidson models equipped with it. Treat this as a firm limit, not a minor installation preference. Identify the cooler before selecting a kit. If the motorcycle has one, the stated application does not fit that configuration. Do not assume that relocating parts will solve the issue, as this would change the installation beyond the described fitment.
Model-year matching is only the first step. Confirm the exact trim, then identify equipment that may affect mounting. For example, a 2020 Street Glide and a 2020 CVO both fall within the named range, but their labels still need to match the kit’s stated application. A Road Glide from the same year is a different named model. The shared year does not make those applications interchangeable.
Use this sequence: identify the model, record the year, check for the UltraCool Oil Cooler, then compare the application and mounting instructions. This helps distinguish clear matches from cases that need a different installation approach. For a Road Glide, do not rely on a Street Glide fitment description alone. The fabrication report illustrates why model-specific mounting details matter. Fitment depends on the named application and the motorcycle’s actual equipment.
Kit price
Compare the complete installation cost, not just the stabilizer. A Road Glide may need a different mounting approach from a Street Glide. A service-shop employee described Road Glide damper installation as possible, but requiring fabrication, which can change the work involved. The mounting method and the motorcycle’s existing equipment both matter. For a useful comparison, separate the kit price from fitting labor and any additional fabrication.
Start with the exact model and year. The stated application covers 2015-2026 Street Glide and CVO models. That range doesn’t automatically establish Road Glide fitment. A Road Glide installation involving fabrication differs from a direct, model-matched installation. Ask what work the quoted amount includes. Consider parts, mounting hardware, labor, and fabrication as separate line items. This breakdown makes two different installation plans easier to compare.
Use this checklist when reviewing a quote:
- Application: Does the kit match the named model and year?
- Included parts: Which stabilizer components and hardware are included?
- Labor: Does the amount cover installation?
- Fabrication: Does the Road Glide setup require custom mounting work?
- Equipment: Does the motorcycle have an UltraCool Oil Cooler?
The UltraCool Oil Cooler affects the decision before any cost comparison. The kit does not fit Harley-Davidson models equipped with that cooler, so a quote for an incompatible setup is not a meaningful comparison. Identify the cooler first, then assess the correct application and mounting plan. This avoids comparing costs for a kit that does not suit the motorcycle’s configuration.
Installation complexity can also affect overall spending. A described bolt-on installation without cutting, drilling, or modification differs from fabrication work. The Road Glide fabrication report illustrates that distinction. Do not assume installation labor for one model applies to another. A Street Glide and a Road Glide may need different mounting approaches, even within the Touring family. The model-specific work, not the “Touring” label, determines what installation involves.
Finally, compare value against the actual setup. A 16-click adjuster offers multiple damping positions, but that feature alone doesn’t establish whether a kit fits your Road Glide. Confirm the application, included components, and mounting requirements first. Then compare the complete cost of a compatible solution. A clear breakdown lets you see whether the amount reflects the stabilizer, installation, fabrication, or other required parts. Keep fitment and total installed cost together in your decision.
Treat that figure as the kit price, not automatically as the total installed cost. The listing gives a starting point for comparing a compatible Street Glide or CVO setup. Establish fitting costs and any additional work separately.
Before relying on the listed price for a Road Glide, confirm that the proposed application and mounting plan suit the motorcycle. The section describes fabrication as a possibility for Road Glide installation, so labor and fabrication costs may need to be considered separately from the kit. Ask what parts and work the quote includes, and compare only plans suited to the motorcycle’s model, year, and equipment.
Steering wobble reduction
Choosing the best steering stabilizer for Harley Road Glide riders starts with diagnosis. A stabilizer can resist sudden steering inputs. It can’t identify why a Harley feels unstable. Riders report symptoms at different speeds and under different conditions. One Road Glide owner described front-end wobble around 115-120 mph. Another discussion raised instability at 75 mph. Those reports don’t establish one universal speed threshold or cause.
Begin with the front tire. Check its pressure and condition before changing steering hardware. A forum post advises comparing pressure with the Harley-Davidson owner’s manual and the front left downtube. The listed values are 36-40. Inspect tread wear, too. One Road Glide owner reported a badly cupped Michelin front tire, despite riding it for less than 10,000 miles. After replacing that tire, the rider said they hadn’t ridden faster than 110 mph.
Steering-head bearings are another diagnostic point. A forum participant recommended checking or tightening them when investigating wobble. Assess bearing condition alongside the tires. A stabilizer will not correct a worn tire or a steering component that needs attention. Identifying the cause gives you a clearer basis for deciding whether damping belongs in the setup.
- Compare tire pressure with the manual and downtube values.
- Inspect the front tire for cupping or uneven wear.
- Assess steering-head bearings as part of diagnosis.
- Record when instability occurs, including speed and cornering.
Conditions vary across motorcycles. A 2019 Harley-Davidson Street Glide Special was discussed for front-end instability. A participant with a 2018 Street Glide said it felt stable at normal highway speeds. Another Street Glide rider described the front tire or steering seeming to walk at 110-120 km in a long, sweeping corner. Those examples differ in model, speed, and riding situation. They don’t establish one cause or setting.
Wind and chassis inputs can also affect how a motorcycle feels. One forum participant suggested a different windshield, stiffer front suspension, or different handlebars for high-speed input on a Street Glide. Treat these as setup factors, not a diagnosis. Note the conditions carefully: does instability occur during acceleration, braking, or a sweeping turn? Does it persist after the tires and steering components have been assessed?
For the best steering stabilizer for Harley Road Glide owners, match fitment only after identifying the cause. If a compatible stabilizer is the next step, explore Harley Road Glide stabilizer options. A methodical diagnosis keeps the decision grounded in the motorcycle’s actual behavior.
Carbon Moto USA: BMW R 1300 GS Carbon Fiber
Carbon Moto USA offers BMW R 1300 GS Carbon Fiber for riders building a focused adventure motorcycle setup. If your garage includes multiple platforms, its range also includes BMW R 1250 GS Carbon Fiber, Harley Davidson Pan America Carbon Fiber, and Ducati Carbon Fiber. These are distinct model-specific categories, so start with the motorcycle you’re equipping and choose parts intended for that platform.
For Road Glide owners, use the fitment and diagnostic steps above to guide the stabilizer decision. For a separate BMW, Pan America, or Ducati build, explore the corresponding carbon-fiber offerings. Contact Carbon Moto USA to discuss its listed motorcycle products.
Make the next setup decision with intention
Choosing the best steering stabilizer for a Harley Road Glide starts with a clear record of the motorcycle’s model, equipment, and handling symptoms. Use that information to assess fitment and determine what the front end needs before changing the setup. If wobble continues after the tires and steering components are assessed, carry those observations into your next decision. A focused diagnosis gives you a better basis for selecting parts and planning the installation.
Carbon Moto USA also offers BMW R 1300 GS Carbon Fiber, BMW R 1250 GS Carbon Fiber, and Harley Davidson Pan America Carbon Fiber for riders building other platforms. For questions about its motorcycle offerings, contact Carbon Moto USA. Make each change deliberately, and keep your next ride centered on a setup that suits your motorcycle.